Real-time monitoring and analytics
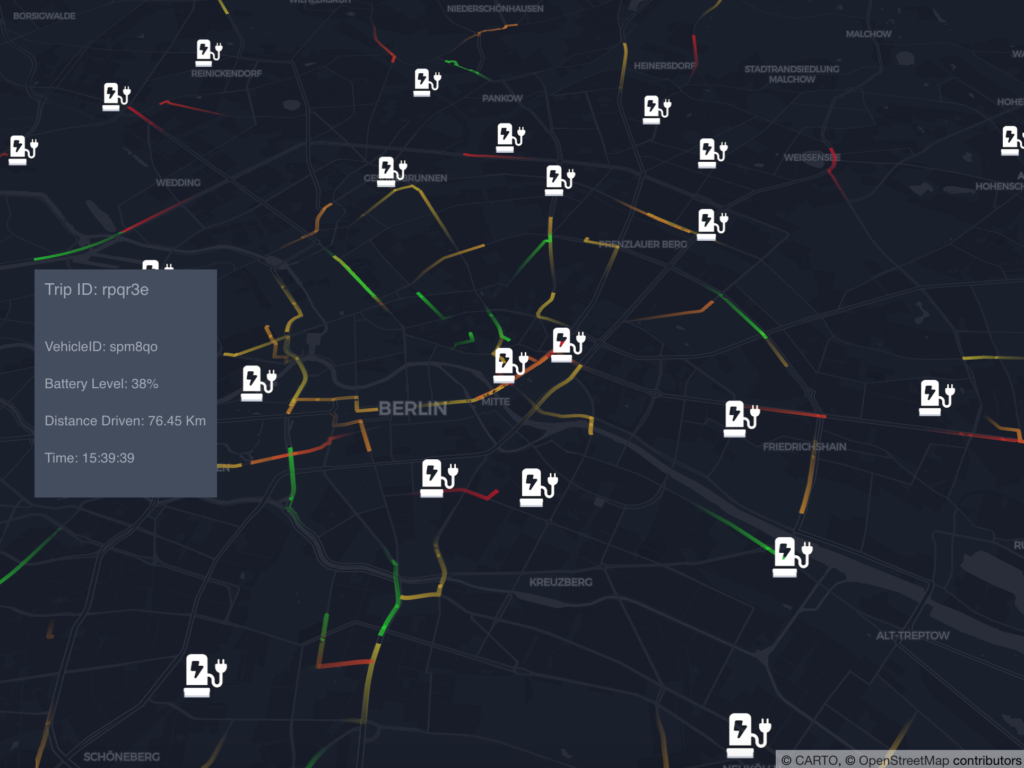
This use case demonstrates how Quick can be used to process data streams and consume the results to build live dashboards. For that, we consider the example of a car-sharing company. Their fleet of cars drives around the city. All of them emit statuses that, among others, include the trip's and vehicle's ids as well as the car's current position and battery level.
What this will demonstrate
- aggregations on an incoming stream
- how to join topic data at query-time
- subscriptions in action
- the ingest REST API used by an example producer
A dashboard displays this information on an interactive map:
Apache Kafka and data processing
Quick is based on Apache Kafka.
It organizes and stores event streams in topics.
In this use-case, a vehicle topic contains the vehicle name and range.
A status topic contains the emitted status events (e.g. battery level).
Such event streams can be processed with the help of Kafka Streams.
For example, an application can accumulate status events with the same trip id into a trip.
It simply groups the incoming status events by their trip id and appends them to a list.
The result is written into the trip topic.
void buildTopology(StreamsBuilder builder){
    builder.stream("status")
        .groupBy((key,status)->status.getTripId())
        .aggregate(Trip::new,this::aggregateTrip)
        .toStream()
        .to("trip");
}
Trip aggregateTrip(String tripId, Status newStatus, Trip trip){
    List<Status> route = trip.getRoute();
    // first time we see this trip id
    if (route == null) {
        trip.setId(tripId);
        trip.setVehicleId(newStatus.getVehicleId());
        route = new ArrayList<>();
        trip.setRoute(route);
    }

    route.add(newStatus);
    return trip;
}
You can find the full code in our example repository. The Kafka Streams application is written with our streams-bootstrap library, which, among others, offers sensible defaults and reduces the required boilerplate code.
GraphQL schema
After defining the topics, it is time to model the data required in the dashboard.
Quick's querying logic is built upon the data query language GraphQL.
It allows you to create a global schema of the data and the supported operations.
Subscriptions are one type of such operations,
allowing you to consume real-time data updates of the data through WebSocket connections.
This is an exemplary GraphQL schema for live updates of the emitted status events.
It contains a subscription operation called statusUpdates that delivers live updates of Status events.
type Subscription {
    statusUpdates: Status @topic(name: "status")
}
type Status {
    statusId: String
    tripId: String
    vehicleId: String
    position: Position
    batteryLevel: Int
    distance: Int
    timestamp: Int
}

type Position {
    lat: Float
    lon: Float
}
Besides the live updates, single trips should also be accessible.
A trip is the accumulation of all statuses with the same trip id.
As this information should be queried on demand, subscriptions do not work in this case.
GraphQL offers the Query operation instead.
The query is called trip and allows to pass an id as an argument and returns the
corresponding Trip.
type Query {
    trip(id: String): Trip
}

type Trip {
    id: String!,
    vehicleId: String!,
    route: [Status]
}
Connecting Apache Kafka & GraphQL
Quick introduces a custom GraphQL directive called @topic.
It allows you to annotate fields and connect them to a topic.
With that, you define the relationship between the GraphQL schema and Kafka.
First, connect the statusUpdates subscription to the status topic.
This ensures that each event written to the Kafka topic is pushed into the GraphQL WebSocket connection.
type Subscription {
    statusUpdates: Status @topic(name: "status")
}
Trip itself:
Trip has a new field vehicle.
It is populated with the vehicle topic data based on the trip's vehicleId value.
One major advantage of GraphQL is its flexibility.
When querying a trip, you can decide if you indeed require the vehicle information.
If this is not the case, the corresponding data is never loaded, and thus no overhead occurs.
However, if the data is needed, Quick transparently joins the vehicle information into the trip.
type Query {
    trip(id: String): Trip @topic(name: "trip", keyArgument: "id")
}

type Trip {
    id: String!,
    vehicleId: String!,
    vehicle: Vehicle @topic(name: "vehicle", keyField: "vehicleId")
    route: [Status]
}

type Vehicle {
    id: String!,
    name: String!,
    maxRange: Int!
}
Quick
Now you are ready to process and query the data with Quick. To start a Quick instance, you can refer to the getting started guide.
Gateway
Create a new gateway and apply the GraphQL schema.
Final GraphQL schema (schema.gql)
type Query {
    trip(id: String): Trip @topic(name: "trip", keyArgument: "id")
}

type Trip {
    id: String!,
    vehicleId: String!,
    vehicle: Vehicle @topic(name: "vehicle", keyField: "vehicleId")
    route: [Status]
}

type Vehicle {
    id: String!,
    name: String!,
    maxRange: Int!
}

type Subscription {
    statusUpdates: Status @topic(name: "status")
}

type Status {
    statusId: String
    tripId: String
    vehicleId: String
    position: Position
    batteryLevel: Int
    distance: Int
    timestamp: Int
}

type Position {
    lat: Float
    lon: Float
}
quick gateway create car-sharing
quick gateway apply car-sharing -f ./schema.gql
Topics
Next, create all required topics. The command expects the topic name as well as the type or schema of key and value. Since the values are complex, you need to reference the GraphQL types.
quick topic create vehicle -k string -v schema --schema car-sharing.Vehicle
quick topic create status -k string -v schema --schema car-sharing.Status
quick topic create trip -k string -v schema --schema car-sharing.Trip
Application
Then, start the Kafka Streams application. Quick supports running dockerized applications.
quick app deploy trip-aggregator \
 --registry bakdata \
 --image quick-demo-monitoring-trip-aggregator \
 --tag latest \
 --args input-topics=status output-topic=trip
For more detailed information, call quick app deploy -h
or see the reference.
The bakdata image registry can be found here.
Go live
When all resources are up, you can start to ingest data into the system.
For this, checkout the examples git repository.
Quick supports the ingest through a REST-API.
For example, the following snippet shows a command ingesting new vehicles into the vehicle topic.
curl -X POST --url $QUICK_URL/ingest/vehicle \
  --header "content-type: application/json" \
  --header "X-API-Key:$QUICK_API_KEY" \
  --data "@./simulator/data/vehicles.json"
Example data are contained in carsharing/simulator/data. You may also follow the steps described there to create your own dataset.
You can now start the simulation by sending data to the status topic.
The script requires the environment variables QUICK_URL and QUICK_API_KEY set
and the python requirements installed.
python -m car_sharing_simulator.simulator
With the simulation running, you can use queries and subscriptions.
Subscriptions target the url ws://${QUICK_HOST}/gatway/car-sharing/graphql-ws.
If you are using Altair, you can follow this setup.
subscription {
    statusUpdates {
        statusId
        tripId
        vehicleId
        position {
            lat
            lon
        }
        batteryLevel
        distance
        timestamp
    }
}
For example, a subscription can yield the following results:
| statusId | tripId | vehicleId | position.lat | position.lon | batteryLevel | distance | timestamp |
|---|---|---|---|---|---|---|---|
| drj02vln8nwvwp5goc | 2i8wnx | o0338h | 13.422029 | 52.50517 | 75 | 24942 | 1616808550 |
| 271m5qzgno3lrh0bn6 | blnd1l | eikegb | 13.293791 | 52.54985 | 75 | 26312 | 1616808550 |
| 02xhrscvc6o0vijyk8 | jkehob | jis2t3 | 13.262929 | 52.54061 | 86 | 33972 | 1616808550 |
| 8clm8g1cu50tasdje8 | 5vfevl | uae6rs | 13.454952 | 52.48825 | 79 | 50281 | 1616808550 |
| ru3bcvq4t08rko7n4i | vkzhze | 2vn7p2 | 13.424133 | 52.485806 | 70 | 118558 | 1616808550 |
| h27j9qbpnim6v1l62x | x7rsxx | xc9bwi | 13.411969 | 52.54107 | 54 | 147317 | 1616808550 |
| k77v3tnu38n14n9unu | 6a8t0o | bkoi9p | 13.505628 | 52.57557 | 82 | 29753 | 1616808550 |
| f0so763cwocqmronef | mikdho | 1sjhjr | 13.285142 | 52.49432 | 41 | 168217 | 1616808550 |
| 367iyqn9x7xcls7lwv | f4ialb | 06zmlu | 13.351915 | 52.472813 | 67 | 69773 | 1616808550 |
| kqtlcsiz08cjxjhk3h | mdoh37 | wu3qia | 13.293555 | 52.536884 | 45 | 172664 | 1616808550 |
| oxi6tmcg9kied6svuc | uwz5xq | 3q0q0d | 13.398802 | 52.572403 | 47 | 102869 | 1616808550 |
| 9rodzbkwqllqqbc3d3 | voxul7 | v6k3ou | 13.444397 | 52.46356 | 91 | 9592 | 1616808551 |
| ... | ... | ... | ... | ... | ... | ... | ... |
Inspect a single trip using the following query:
{
  trip(id: "jvae2u") {
    id
    vehicle {
      name
      maxRange
    }
    route {
      statusId
      position {
        lat
        lon
      }
      statusId
      distance
      timestamp
    }
  }
}
{
  "data": {
    "trip": {
      "id": "jvae2u",
      "vehicle": {
        "name": "BMW i3",
        "maxRange": 396
      },
      "route": [
        {
          "statusId": "qw05eq3h8ct4x7q2p0",
          "position": {
            "lat": 13.393371,
            "lon": 52.52579
          },
          "distance": 180625,
          "timestamp": "1616789646"
        },
        [...],
        {
          "statusId": "oebajab2xrgvdgo30d",
          "position": {
            "lat": 13.426252,
            "lon": 52.534878
          },
          "distance": 184009,
          "timestamp": "1616790087"
        }
      ]
    }
  }
}